|
 I have been searching for the perfect
mirrors to go on my Z car for quite some time. I am pretty sure that I
have found them. They are from any of the Mitsubishi 3000GT cars and step
up to a power/heated configuration. I will have to report on the wiring
details later. I can report that I have the factory schematics and it will
be an easy job. Just make sure to get the control switch out of the car,
too! I have been searching for the perfect
mirrors to go on my Z car for quite some time. I am pretty sure that I
have found them. They are from any of the Mitsubishi 3000GT cars and step
up to a power/heated configuration. I will have to report on the wiring
details later. I can report that I have the factory schematics and it will
be an easy job. Just make sure to get the control switch out of the car,
too!
Read my commentary on the search for the perfect mirror... |
| Parts Needed |
- Drill & bit assortment
- Fiberglass resin and hardener
- woven fiberglass cloth
- disposable paint brushes
- aluminum foil
- 2-part, "clay-type" epoxy (I used POR15:)
- body filler
- Plasti-dip Spray
- sandpaper; various grit
- wooden dowel; 1/4" diameter
|
 |
| Observations |
The 3000GT mirrors
seem to be the perfect fit at the moment. The mirrors give great
visibility and can be adjusted manually or hooked up for power
functionality. The mirrors mount in the same general location as the stock
mirrors but new holes will have to be drilled.
The 3000GT mirrors have two holes for mounting with screws or bolts. These
holes do not match up with the existing holes usually found on a Z. A
third hole will also be needed because of a locating pin that the mirror
uses. There is a pin that protrudes from the base of the mirror into the
door skin. Aside from having to drill another hole, I LIKE IT. The pin
gives extra stability and helps in the mounting process as well. |
| Getting Started |
|
The first thing is
to find where you need the mirror to be in order to work best for you. I
started by rolling down the driver side window and using my left hand to
hold the mirror where I needed it to be. I then drilled a hole for the
locating pin so that the mirror would sit flush with the door surface.
Luckily, I have some extra doors lying around and didn't care about the
ones on my car. Once I found the ideal spot for the mirror, I used the
plastic base trim (the thin, black plastic that sandwiches between the
mirror base and the door) to locate the two bolt holes and drilled a pilot
hole for each.
Once you have found the correct placement for the mirror, you will find
that the angle of the Z door skin is different than the 3000GT and so you
must correct for that. I did so by shimming the plastic base of the mirror
with POR15 epoxy, fiberglass and body filler. The next section will show
how. |
|
The angle of the Z door leaves the mirror
pointing down towards the ground. The answer was to shim up the outer edge
of the mirror base to swing the top of the mirror back toward the car so
that it would be level. All it takes is a little bit of know-how and some
elbow grease. |
|
I first set out to make a "mold"
of the door contours so that I wouldn't get fiberglass all over the door
itself. Use the aluminum foil to cover the door skin around where you want
the mirror to be. You will be using fiberglass here so use enough foil to
protect the surrounding area and use masking tape to hold it to the car. |
|
 Fiberglass
won't stick to aluminum foil. It is the perfect material to use to protect
any surface that you desire to make a mold of with fiberglass - including
interior areas like kick panels, etc. Fiberglass
won't stick to aluminum foil. It is the perfect material to use to protect
any surface that you desire to make a mold of with fiberglass - including
interior areas like kick panels, etc. |
|
Mix up some fiberglass resin and hardener
and use the disposable brush to apply a thin layer onto the foil. Apply
the fiberglass cloth to the wet resin and use the brush to make it form to
the shape of the door. Use about 2 or 3 layers of the cloth so that it
will have some strength when it is dry. Let the glass dry until it is dry.
Drill holes in the fiberglass in the same locations as the bolt holes and
locating pin hole on the door. |
|
 It
is best to do both sides at once so that it is easier to make the left and
right sides uniform for a consistent look. Be sure to trim both fiberglass
pieces at the same time and compare them as mirror images during the
shaping process. It
is best to do both sides at once so that it is easier to make the left and
right sides uniform for a consistent look. Be sure to trim both fiberglass
pieces at the same time and compare them as mirror images during the
shaping process. |
|
Place the plastic base on the fiberglass and
use the locating pin to get everything in the right place. Trace the
outline of the plastic base onto the fiberglass. This is a good time to
trim your fiberglass piece down to the desired size and shape according to
how you want the final piece to look. Remember that you will have to fill
and smooth the transition area from the fiberglass up to the original
plastic base. The outline will keep you from cutting away too much
fiberglass. |
|
Break off a short piece of the wooden dowel
(about 1"). Place the dowel between the plastic base and the
fiberglass, specifically under the outer edge of the plastic base. This
will rotate the mirror upwards and toward the top of the car. Move the
dowel around until the correct angle is achieved. You will need to get
back in the car and hold the mirror in place to get the angle just right.
Once you know where the dowel should be in order to achieve the correct
angle, use the clay-like epoxy to hold everything together temporarily. |
|
Use
epoxy clay, as much as possible, rather than body filler. Body filler will
soak up moisture and is not as durable as epoxy. Use body filler only to
smooth out the piece for a good finish. |
|
Check and re-check your angles and mirror
location before the epoxy sets up and hardens. Pack an excess of epoxy
between the fiberglass and the plastic base so that you won't have voids
that will cause weak spots. Let everything cure. |
|
Base Finish |
|
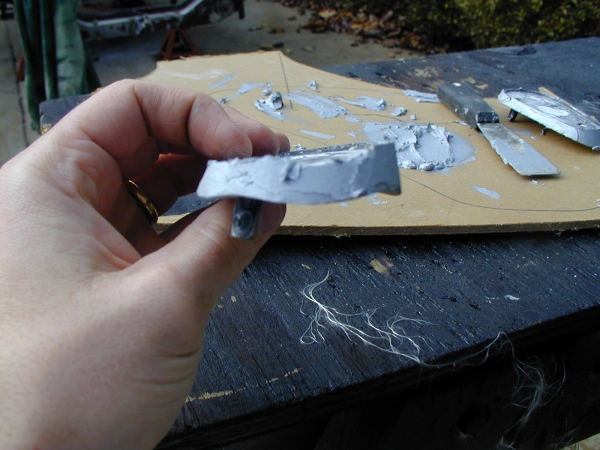
After the base piece is cured, use epoxy to
fill in any gaps and to smooth the piece as much as possible. Use
sandpaper where needed and then use a light body filler to fill small
imperfections and get things ready to paint. Make sure everything has
cured and then apply your choice of coatings. Be sure to drill out all
necessary holes on the base: wiring, bolts, etc.
I used a couple of coats of Rustoleum rusty metal primer and then
topcoated with several thin coats of black spray-on Plastidip. |
|
Mounting |
|
I opted to put rivet-type thread inserts in
my door panel for installation. It is a nice, clean way of doing things
and makes mirror removal very easy because machine screws can be used. The
inserts and special riveting tool can be purchased from Harbor Freight
Tools (by far the most inexpensive), Grainger or Eastwood.
I love the look of the mirror, I can really see the road behind me and I
can't wait to hook up the power and heat:)
Good luck. |